Hi all,
today I will show you how to configure a DHCP server onto Ubuntu Server 11.04 already running.
first you should check that the server has a static ip address,
vi /etc/network/interfaces
in my case is something like this:
auto eth0
iface eth0 inet static
address 192.168.0.100
netmask 255.255.255.0
network 192.168.0.255
gateway 192.168.0.1
then check for the name servers:
vi /etc/resolv.conf
I have this:
nameserver 192.168.0.1
if you change yours files (interfaces and/or resolv.conf) , you need to type this:
/etc/init.d/networking restart
check also your hostname file:
vi /etc/hosts
should be something like this:
127.0.0.1 localhost.localdomain localhost
192.168.0.100 server1.example.com server1
bcause in my case the server is called "server1"
DHCP installation and configuration
First download and install the dhcp service:
sudo apt-get install dhcp3-server
after the installation you will see a failed status, but it's ok, because we still need to configure the service.
vi /etc/dhcp/dhcpd.conf
Now we are going to change the file to configure our subnet,
in my case my server is 192.168.0.100 so my configuration will be something like this:
subnet 192.168.0.0 netmask 255.255.255.0 {
range 192.168.0.10 192.168.0.50;
option broadcast-address 192.168.0.255;
option routers 192.168.0.1;
}
This way the service will release addresses in the range 192.168.0.10 -> 192.168.0.50
save the file and restart the dhcp service:
/etc/init.d/isc-dhcp-server start
Now the dhcp should be working fine.
There are a lot of other options that can be configured in the dhcpd.conf file, check the documentaiton for that
bye
Digger

venerdì 16 dicembre 2011
mercoledì 14 dicembre 2011
Sniff switched network with ettercap-ng for windows
Hi all,
a quick guide about one (there are other) way to sniff network traffic in a switched lan.
The enviroment is:
PCA
PCB
monitoring-PC (os: win xp, 2 NICs installed)
my monitoring pc is a laptop with only 1 nic, so I used a DLINK external USB NIC (name: DUB-E100) as second NIC.
PCA is connecting to PCB
on your "monitoring-PC" you want to see(sniff) the traffic between A and B but you cannot install anything on them and they are connected using a switch.
The problem is that in a switched enviroment you usually cannot sniff packets like you do using an HUB.
If you have an hub you can connect it in the middle, else if you have a way to setup a monitoring port on the switch, ok, but else it's a problem.
You could ARP poisoning the devices to then sniff (or also do a mac flooding to put the switch in a failed open state), but in my experience this could be dangerous sometimes and it often doesn't work very well.
SOLUTION
A solution I found today is to use ETTERCAP-NG for windows.
You can install it on your monitoring pc, using 2 network card, configure it for a "bridged sniffing" and then run a sniffer like "Wireshark".
You simply need to disconnect A or B and put your monitoring pc in the middle using the 2 NICs.
example:
A--- (nic1)monitoringPC(nic2) ---- switch ----B
or
A--- switch ---(nic1)monitoringPC(nic2) ------B
This way the monitoringPC is acting as a bridge and the packets between A and B are visible on the monitoringPC.
ETTERCAP-NG
http://sourceforge.net/projects/ettercap/files/
open "unofficial binaries", then "windows", then download "ettercap-NG-0.7.3-win32.exe"
WIRESHARK
http://www.wireshark.org/
INSTRUCTIONS (on the monitoring pc with 2 nics installed, in my case XP operating system)
Download and install ettercap-ng, then download and install wireshark.
Start Ettercap-ng
from the "Sniff" menu select "Bridged sniff"

Then from the windows that appear select the nics to be used for creating the bridge

Now from the "Start" menu select "Start sniffing"

Now you can open "Wireshark" (or other sniffing tool) to see the traffic

The red arrows indicate what I changed from the default.
Important is to select "promiscuous" else you'll not see all the packets as they are not directed to you (the monitorinc pc), then I changed the nic to the USB one (but also the other is ok).
Unflagged "Automatic scrolling" because I prefere this way, but this is up to you.
That's all, at this point you should see all the packets between the 2 machines.
bye
Digger
a quick guide about one (there are other) way to sniff network traffic in a switched lan.
The enviroment is:
PCA
PCB
monitoring-PC (os: win xp, 2 NICs installed)
my monitoring pc is a laptop with only 1 nic, so I used a DLINK external USB NIC (name: DUB-E100) as second NIC.
PCA is connecting to PCB
on your "monitoring-PC" you want to see(sniff) the traffic between A and B but you cannot install anything on them and they are connected using a switch.
The problem is that in a switched enviroment you usually cannot sniff packets like you do using an HUB.
If you have an hub you can connect it in the middle, else if you have a way to setup a monitoring port on the switch, ok, but else it's a problem.
You could ARP poisoning the devices to then sniff (or also do a mac flooding to put the switch in a failed open state), but in my experience this could be dangerous sometimes and it often doesn't work very well.
SOLUTION
A solution I found today is to use ETTERCAP-NG for windows.
You can install it on your monitoring pc, using 2 network card, configure it for a "bridged sniffing" and then run a sniffer like "Wireshark".
You simply need to disconnect A or B and put your monitoring pc in the middle using the 2 NICs.
example:
A--- (nic1)monitoringPC(nic2) ---- switch ----B
or
A--- switch ---(nic1)monitoringPC(nic2) ------B
or
...etc (exchange nic1 and nic2)
This way the monitoringPC is acting as a bridge and the packets between A and B are visible on the monitoringPC.
ETTERCAP-NG
http://sourceforge.net/projects/ettercap/files/
open "unofficial binaries", then "windows", then download "ettercap-NG-0.7.3-win32.exe"
WIRESHARK
http://www.wireshark.org/
INSTRUCTIONS (on the monitoring pc with 2 nics installed, in my case XP operating system)
Download and install ettercap-ng, then download and install wireshark.
Start Ettercap-ng
from the "Sniff" menu select "Bridged sniff"
Then from the windows that appear select the nics to be used for creating the bridge
Now from the "Start" menu select "Start sniffing"
Now you can open "Wireshark" (or other sniffing tool) to see the traffic
The red arrows indicate what I changed from the default.
Important is to select "promiscuous" else you'll not see all the packets as they are not directed to you (the monitorinc pc), then I changed the nic to the USB one (but also the other is ok).
Unflagged "Automatic scrolling" because I prefere this way, but this is up to you.
That's all, at this point you should see all the packets between the 2 machines.
bye
Digger
venerdì 2 dicembre 2011
Windows 7 Search - missing files - resolution
Hi all,
are you in the same situation as me?
Are you searching in a particular folder (and subfolders) for a filename, or for content, and AS ALWAYS windows 7 search doesn't find it? also if you know for sure the file is there and/or the content is there in some file??
Honestly I hate the way Windows 7 indexes everything (slowing down the pc) just to speed up searching something from time to time, and then also you don't find it because at the end it doesn't work as it should...
Ok, there are some tips to make windows search working better, like unflagging all the folders in the indexing option, in this way windows will search not using the indexing at all.
Then you'll not find content anymore I suspect, so you should flag the folder "one shot" just to start indexing on demand (but you should also disable indexing backoff to make it works).
Ok, the REAL solution?
DON'T USE WINDOWS SEARCH... use something else
Unflag ALL the flags in the indexing options so that no folder is indexed (this will speed up you pc in some way), just keep Outlook flag so you can search mails.
Then istall some search tool (I'm using Agent Ransack as it does its job well) and use it instead!
venerdì 25 novembre 2011
Cannot boot OpenSuse 12 after cloning disk due to by-id access to the disk
Hi all,
today I tried to clone a pc with OpenSuse12 using Clonezilla as cloning solution.
Then I tried to boot the target cloned machine but it wasn't able to boot and the errors was something like this (the disk names are from another post, just as an example) :
Trying manual resume from /dev/disk/by-id/ata-TOSHIBA-MK1246GSX-28FGTI70T-part1
resume device dev/disk/by-id/ata-TOSHIBA-MK1246GSX-28FGTI70T-part1 not found (ignoring)
Trying manual resume from /dev/disk/by-id/ata-TOSHIBA-MK1246GSX-28FGTI70T-part1
resume device dev/disk/by-id/ata-TOSHIBA-MK1246GSX-28FGTI70T-part1 not found (ignoring)
Waiting for device dev/disk/by-id/ata-TOSHIBA-MK1246GSX-28FGTI70T-part2 to appear : ........................ Could not find dev/disk/by-id/ata-TOSHIBA-MK1246GSX-28FGTI70T-part2 .
Want me to fall back to dev/disk/by-id/ata-TOSHIBA-MK1246GSX-28FGTI70T-part2 ? (Y/N)
y
Waiting for device dev/disk/by-id/ata-TOSHIBA-MK1246GSX-28FGTI70T-part2 to appear : ...............not found -- exiting to /bin/sh
The typical messages are:
Trying manual resume from
resume device dev/disk/by-id/ata-...-part1 not found (ignoring)
Waiting for device dev/disk/by-id/ata-...-part2 to appear
Could not find dev/disk/by-id/ata-...-part2
Want me to fall back to dev/disk/by-id/ata-...-part2 ? (Y/N)
This happens due to a new default setting in OpenSuse: from Ver.10Sp1 on, the new default is to reference the storage device (the disks) "by-id" instead of by-name
I mean, in the past the disks was referenced like this:
sda
sdb
...
then the partitions of the first disk (sda) was:
sda1
sda2
sda3
and so on.
Now the new way to reference disk and partition is:
The disks are (just an example, it changes based on the disk manifacturer and other data):
/dev/disk/by-id/ata-TOSHIBA-MK1246GSX-28FGTI70T
/dev/disk/by-id/ata-ST380013AS_4MR2NSD8
where the first row is the first disk, a Toshiba disk, the second is another disk, a Seagate disk.
The partitions will be, for the first disk, for example:
/dev/disk/by-id/ata-TOSHIBA-MK1246GSX-28FGTI70T-part1
/dev/disk/by-id/ata-TOSHIBA-MK1246GSX-28FGTI70T-part2
for the second disk:
/dev/disk/by-id/ata-ST380013AS_4MR2NSD8-part1
/dev/disk/by-id/ata-ST380013AS_4MR2NSD8-part2
The problem with cloning is that around the system, in some configuration files, there are references to the original disks "by-id", unfortunately on the target computer (where we restore the image) the disks will be different, will have different "by-id" name, so linux will be unable to find the disks and boot correctly.
SOLUTION
The solution is quite simple.
After creating the MASTER computer, we need to change 2 files in order to modify the "by-id" reference in "by-name" reference.
The files are:
/etc/fstab
/boot/grub/menu.lst
in both the files we need to find every instance of names like (example)
/dev/disk/by-id/ata-TOSHIBA-MK1246GSX-28FGTI70T-part1
and change in something like:
/dev/sda1
take care about the partition number:
-part1 -> sda1
-part2 -> sda2
and so on.
To modify those files from a command prompt we need to run the editor using sudo else we will get an error (missing rights):
sudo vi /etc/fstab
(then i to go into insert mode, change the disk name, then press ESC to exit insert mode, then :wq to write the changes to disk and quit, else to discard changes :qa!)
sudo vi /boot/grub/menu.lst
(same instruction as above)
Reboot the computer to check that everything is still working fine.
You are now ready to create the image with Clonezilla (or other cloning solution) and restore on the target pc.
SAMPLE
Here how my files appeared before and after the change:
/etc/fstab
BEFORE
/dev/disk/by-id/ata-ST380013AS_4MR2NSD8-part1 swap swap defaults 0 0
/dev/disk/by-id/ata-ST380013AS_4MR2NSD8-part2 / ext4 acl,user_xattr 1 1
/dev/disk/by-id/ata-ST380013AS_4MR2NSD8-part3 /home ext4 acl,user_xattr 1 2
proc /proc proc defaults 0 0
sysfs /sys sysfs noauto 0 0
debugfs /sys/kernel/debug debugfs noauto 0 0
usbfs /proc/bus/usb usbfs noauto 0 0
devpts /dev/pts devpts mode=0620,gid=5 0 0
/etc/fstab
AFTER
/dev/sda1 swap swap defaults 0 0
/dev/sda2 / ext4 acl,user_xattr 1 1
/dev/sda3 /home ext4 acl,user_xattr 1 2
proc /proc proc defaults 0 0
sysfs /sys sysfs noauto 0 0
debugfs /sys/kernel/debug debugfs noauto 0 0
usbfs /proc/bus/usb usbfs noauto 0 0
devpts /dev/pts devpts mode=0620,gid=5 0 0
/boot/grub/menu.lst
BEFORE
# Modified by YaST2. Last modification on Fri Nov 25 21:23:32 CET 2011
# THIS FILE WILL BE PARTIALLY OVERWRITTEN by perl-Bootloader
# For the new kernel it try to figure out old parameters. In case we are not able to recognize it (e.g. change of flavor or strange install order ) it it use as fallback installation parameters from /etc/sysconfig/bootloader
default 0
timeout 8
##YaST - generic_mbr
gfxmenu (hd0,1)/boot/message
##YaST - activate
###Don't change this comment - YaST2 identifier: Original name: linux###
title openSUSE 12.1 - 3.1.0-1.2
root (hd0,1)
kernel /boot/vmlinuz-3.1.0-1.2-default root=/dev/disk/by-id/ata-ST380013AS_4MR2NSD8-part2 resume=/dev/disk/by-id/ata-ST380013AS_4MR2NSD8-part1 splash=silent quiet showopts vga=0x31a
initrd /boot/initrd-3.1.0-1.2-default
###Don't change this comment - YaST2 identifier: Original name: failsafe###
title Failsafe -- openSUSE 12.1 - 3.1.0-1.2
root (hd0,1)
kernel /boot/vmlinuz-3.1.0-1.2-default root=/dev/disk/by-id/ata-ST380013AS_4MR2NSD8-part2 showopts apm=off noresume nosmp maxcpus=0 edd=off powersaved=off nohz=off highres=off processor.max_cstate=1 nomodeset x11failsafe vga=0x31a
initrd /boot/initrd-3.1.0-1.2-default
/boot/grub/menu.lst
AFTER
# Modified by YaST2. Last modification on Fri Nov 25 21:23:32 CET 2011
# THIS FILE WILL BE PARTIALLY OVERWRITTEN by perl-Bootloader
# For the new kernel it try to figure out old parameters. In case we are not able to recognize it (e.g. change of flavor or strange install order ) it it use as fallback installation parameters from /etc/sysconfig/bootloader
default 0
timeout 8
##YaST - generic_mbr
gfxmenu (hd0,1)/boot/message
##YaST - activate
###Don't change this comment - YaST2 identifier: Original name: linux###
title openSUSE 12.1 - 3.1.0-1.2
root (hd0,1)
kernel /boot/vmlinuz-3.1.0-1.2-default root=/dev/sda2 resume=/dev/sda1 splash=silent quiet showopts vga=0x31a
initrd /boot/initrd-3.1.0-1.2-default
###Don't change this comment - YaST2 identifier: Original name: failsafe###
title Failsafe -- openSUSE 12.1 - 3.1.0-1.2
root (hd0,1)
kernel /boot/vmlinuz-3.1.0-1.2-default root=/dev/sda2 showopts apm=off noresume nosmp maxcpus=0 edd=off powersaved=off nohz=off highres=off processor.max_cstate=1 nomodeset x11failsafe vga=0x31a
initrd /boot/initrd-3.1.0-1.2-default
bye
Digger
giovedì 17 novembre 2011
Chrome - disable or remove plugins (Orbit downloader for example)
Hi all,
it happened to me to notice that after uninstalling Orbit downloader, google Chrome still tried to use Orbit to download files, obviously without success.
So there are 2 things you can do now:
1. disable the plugin
2. delete the plugin
The instructions are for Orbit, but the same is valid for every plugin.
== DISABLE PLUGINS ==
in the address bar write:
chrome://plugins
search for Orbit downloader and click on "Disable"
== DELETE PLUGINS ==
FIRST close Chrome!
from the start menu execute:
%localappdata%
to go in the local application data folder
(something like: C:\Users\username\AppData\Local)
then go to the subfolder
Google\Chrome\Application\Plugins
search for the plugin's .dll file (in this case, for Orbit it's "nporbit.dll") and delete it.
Open Chrome, the plugin disappeared
bye
Digger
lunedì 24 ottobre 2011
Windows Live Messenger error 0x81000306
Hi all,
after days of headache trying to solve this stupid error about messenger on my pc I finally found the solution working for me and it was simply this:
run the command prompt (cmd) with administrative rights
type and confirm this command:
netsh interface tcp set global autotuninglevel=disabled
and it started immediately to work!
hope this could help someone else
bye
Digger
lunedì 10 ottobre 2011
Server uptime - Last Boot time
Hi all,
I would like to share with you this nice and useful command from the console to retrieve the local/remote system last boot time.
It's useful for example to calculate the uptime of a remote server
I would like to share with you this nice and useful command from the console to retrieve the local/remote system last boot time.
It's useful for example to calculate the uptime of a remote server
wmic /node:"servername" os get lastbootuptime
to retrive the local boottime simply don't use the /node option
bye
venerdì 29 luglio 2011
Remotely register DLL libraries
Hi all,
we have an application here around the network in quite all the clients that stops working when we deploy Office2010 as a dll file got missing on the client itself.
The fastest solution is to copy the dll back and to register it again.
If you want to do it remotely, and I don't mean with remote desktop, you can do it like this:
Prerequisites:
- You are logged on your pc with a user with admin rights on the target machine
- you already downloaded PSTOOLS from here:
http://technet.microsoft.com/it-it/sysinternals/bb897553.aspx
and have psexec command ready to be run on the disk
(I've already remotely copied the dll file to the c:\windows\system32 on the target machine)
1. open the command prompt
2. change to the psexec directory
3. submit this command:
psexec \\pcname cmd
A command prompt appears on your pc, but it is executing on the target machine (named pcname) !
submit the command to register the dll, but silently because we don't want any message on the target (message that the user will not see anyway as we are executing in a different context):
regsvr32 /s mylibrary.dll
/s is for "silent"
mylibrary.dll is the .dll to be registered
type
exit
to close the remote command prompt and then exit again to close local prompt
that's all, the application is now working again :)
P.S: I used it logged on my pc with a user with admin rights on the target, but if you are not, you could try it with the switches:
-u user -p password
that should do the job (not tried)
bye
Digger
martedì 26 luglio 2011
SCCM 2007 - Fill collection from text file (import machine names)
Hi all,
today I was trying to fill a collection in SCCM2007 importing the machines name from a text file I produced manually using Excel due to some manual work on them (filtering, manual check and so on).
I first tried to import them using the "right-click-tool-menu" on the collection itself.
At first it seems the right way to do it but then I noticed this introduced some strange behaviour in the collection as when you want to edit the collection (right click, properties) you notice that some entries are EMPTY!
So you don't know what you are going to remove...
Very bad..
So I tried other ways, also powershell scripts.
But I was not very satisfied.
So at the end I found my way, ok, not the best one probably, but it does the job.
The way is to create a query in the collection where you put the machine list like this:
select SMS_R_SYSTEM.ResourceID,SMS_R_SYSTEM.ResourceType,SMS_R_SYSTEM.Name,SMS_R_SYSTEM.SMSUniqueIdentifier,SMS_R_SYSTEM.ResourceDomainORWorkgroup,SMS_R_SYSTEM.Client from SMS_R_System where SMS_R_System.Name in ( "PCNAME001" , "PCNAME002" , "PCNAME003" )
Ok, it works.
The problems now are two from my point of view.
1. it is a little bit boring to write the query manually putting all the machine names when I have it in excel and I could do a copy & paste
2. let's say in the future I need to modify the collection adding or removig some machine... not very easy to do
So I found my way also on this, 15 minutes and I wrote this small but useful application in VB.NET:

I write (paste) the machine list on the left, click the upper button and I obtain the query to paste in SCCM.
If I have to modify an existing collection, I copy and paste the query from SCCM to the right textbox and click the bottom button and on the leftI obtain the machine list, then I can edit it adding and removing, click the upper button again and I have the new query to pase in SCCM
For sure there are other tools/ways around, but for what I have to do, this is a good solution for me :)
bye
Digger
today I was trying to fill a collection in SCCM2007 importing the machines name from a text file I produced manually using Excel due to some manual work on them (filtering, manual check and so on).
I first tried to import them using the "right-click-tool-menu" on the collection itself.
At first it seems the right way to do it but then I noticed this introduced some strange behaviour in the collection as when you want to edit the collection (right click, properties) you notice that some entries are EMPTY!
So you don't know what you are going to remove...
Very bad..
So I tried other ways, also powershell scripts.
But I was not very satisfied.
So at the end I found my way, ok, not the best one probably, but it does the job.
The way is to create a query in the collection where you put the machine list like this:
select SMS_R_SYSTEM.ResourceID,SMS_R_SYSTEM.ResourceType,SMS_R_SYSTEM.Name,SMS_R_SYSTEM.SMSUniqueIdentifier,SMS_R_SYSTEM.ResourceDomainORWorkgroup,SMS_R_SYSTEM.Client from SMS_R_System where SMS_R_System.Name in ( "PCNAME001" , "PCNAME002" , "PCNAME003" )
Ok, it works.
The problems now are two from my point of view.
1. it is a little bit boring to write the query manually putting all the machine names when I have it in excel and I could do a copy & paste
2. let's say in the future I need to modify the collection adding or removig some machine... not very easy to do
So I found my way also on this, 15 minutes and I wrote this small but useful application in VB.NET:
I write (paste) the machine list on the left, click the upper button and I obtain the query to paste in SCCM.
If I have to modify an existing collection, I copy and paste the query from SCCM to the right textbox and click the bottom button and on the leftI obtain the machine list, then I can edit it adding and removing, click the upper button again and I have the new query to pase in SCCM
For sure there are other tools/ways around, but for what I have to do, this is a good solution for me :)
bye
Digger
venerdì 10 giugno 2011
Windows Update non funziona, errore 0x8DDD0018
Ciao,
oggi ho perso un sacco di tempo per risolvere questo problema, magari questo post potrebbe risparmiarne un po' a qualcun altro...
Seguendo i consigli di Microsoft ho controllato i servizi BITS, Aggiornamenti automatici, Registro eventi etc, ma purtroppo erano tutti correttamente avviati.
Nel log degli eventi e in quello degli updates non c'erano indicazioni su quale fosse il vero problema, allora alla fine l'unica cosa che mi ha salvato è stato di REINSTALLARE windows update.
Premetto che la procedura potrebbe chiedervi di inserire il cd con la service pack, quindi nel caso il vostro sistema operativo sia servicepakkato vi consiglio di assicurarvi che i files siano ancora sul pc, oppure in alternativa procuratevi la servicepack, oppure il cd con la service pack in modo da avere il tutto a disposizione durante lo step successivo.
Per reinstallare windows update fate cosi:
1. aprite il prompt (esegui, CMD, invio)
2. digitate questo comando e date invio:
%windir%\System32\rundll32.exe setupapi,InstallHinfSection DefaultInstall 132 %windir%\inf\au.inf
3. a questo punto potrebbe chiedervi i famosi files della service pack, fatelo puntare a dove li avete salvati
4. riavviate il pc
5. aprite IE e provate ad andare sul sito di windows update
Se tutto va bene dovrebbe funzionare
ciao
venerdì 27 maggio 2011
Systeminfo e findstr : Ricerca informazioni
Ho trovato questo comando molto interessante per recuperare alcune informazioni utili sul sistema locale in uso:
systeminfo
se volessimo filtrare per qualche informazione in particolare, ad esempio un aggiornamento microsoft:
systeminfo | findstr "KB2079403"
se poi vogliamo recuperare questa informazione da una macchina remota sulla rete:
systeminfo /s \\nomemacchina | findstr "KB2079403"
Il comando "findstr" può tornare utile da solo anche per altri tipi di ricerca, ad esempio per cercare TUTTI i files *.txt (partendo da C:\ e includendo tutte le sottocartelle) che contengono la parola "test" possiamo digitare:
findstr /S test c:\*.txt
potete divertirvi a sperimentare tutte le numerose opzioni :)
ATTENZIONE
di default la ricerca è CASE-SENSITIVE quindi bisogna stare attenti alle maiuscole/minuscole, se si vuole fare una ricerca indipendentemente dal case aggiungere lo switch /i cosi:
findstr /I /S test c:\*.txt
(thanks to SerJ)
di default la ricerca è CASE-SENSITIVE quindi bisogna stare attenti alle maiuscole/minuscole, se si vuole fare una ricerca indipendentemente dal case aggiungere lo switch /i cosi:
findstr /I /S test c:\*.txt
(thanks to SerJ)
giovedì 21 aprile 2011
Windows: copia di file attraverso la rete , riduzione dell'uso della banda
Ciao,
vi è mai capitato di dover copiare una gran quantità di dati attraverso la rete?
A volte lo possiamo fare utilizzando tutta la banda a disposizione, ma altre volte purtroppo la cosa non è fattibile, pensiamo a quando stiamo copiando dati attraverso una WAN dove oltre a noi passano i dati di tutti gli altri utenti e su cui sono basati numerosi servizi.
Se copiassimo al massimo della velocità ammazzeremmo la banda e probabilmente avremmo tutta una serie di disservizi e utenti arrabbiati che si lamenterebbero.
Soluzione:
un modo per copiare files potendo limitare l'uso della banda è ROBOCOPY
tra i parametri di questa utility infatti esiste /IPG:ms che ci permette di specificare quanto tempo deve intercorrere (in ms) tra l'invio di un pacchetto e quello successivo.
Quindi non ci permette direttamente di specificare quanta banda usare, ma andando un po' a tentativi e magari usando un tool che ci visualizza l'uso della banda da parte del nostro pc, arriveremo presto a settare il valore in ms ideale per la nostra copia.
Ecco un esempio:
robocopy "\\fileserver001\share\dati" "c:\backup\" *.pst /IPG:10
il risultato potrebbe essere questo ( notate i 3,2mB/s ) :
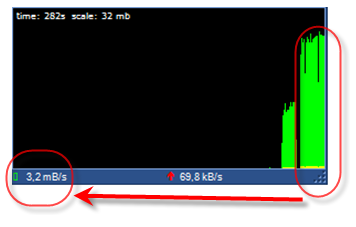
diciamo che 3.2mB/s non ci va bene e vogliamo occupare MENO banda? proviamo a mettere 20:
robocopy "\\fileserver001\share\dati" "c:\backup\" *.pst /IPG:20
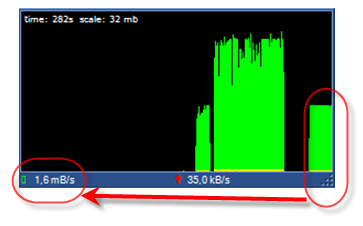
visto ? l'occupazione è passata da 3.2 a 1.6mB/s
A chi interessasse, il tool usato per monitorare la banda nell'esempio è FreeMeter
ciao
alla prossima
vi è mai capitato di dover copiare una gran quantità di dati attraverso la rete?
A volte lo possiamo fare utilizzando tutta la banda a disposizione, ma altre volte purtroppo la cosa non è fattibile, pensiamo a quando stiamo copiando dati attraverso una WAN dove oltre a noi passano i dati di tutti gli altri utenti e su cui sono basati numerosi servizi.
Se copiassimo al massimo della velocità ammazzeremmo la banda e probabilmente avremmo tutta una serie di disservizi e utenti arrabbiati che si lamenterebbero.
Soluzione:
un modo per copiare files potendo limitare l'uso della banda è ROBOCOPY
tra i parametri di questa utility infatti esiste /IPG:ms che ci permette di specificare quanto tempo deve intercorrere (in ms) tra l'invio di un pacchetto e quello successivo.
Quindi non ci permette direttamente di specificare quanta banda usare, ma andando un po' a tentativi e magari usando un tool che ci visualizza l'uso della banda da parte del nostro pc, arriveremo presto a settare il valore in ms ideale per la nostra copia.
Ecco un esempio:
robocopy "\\fileserver001\share\dati" "c:\backup\" *.pst /IPG:10
il risultato potrebbe essere questo ( notate i 3,2mB/s ) :
diciamo che 3.2mB/s non ci va bene e vogliamo occupare MENO banda? proviamo a mettere 20:
robocopy "\\fileserver001\share\dati" "c:\backup\" *.pst /IPG:20
visto ? l'occupazione è passata da 3.2 a 1.6mB/s
A chi interessasse, il tool usato per monitorare la banda nell'esempio è FreeMeter
ciao
alla prossima
mercoledì 30 marzo 2011
Aprire files CHM
Ciao,
per aprire le guide in formato .chm sul vostro Ubuntu potete usare xCHM, procedete cosi:
sudo apt-get install xchm
(nel caso ci sia bisogno, preceduto da un sudo apt-get update )
ciao
per aprire le guide in formato .chm sul vostro Ubuntu potete usare xCHM, procedete cosi:
sudo apt-get install xchm
(nel caso ci sia bisogno, preceduto da un sudo apt-get update )
ciao
Aprire files .RAR su ubuntu
Ciao,
per integrare la possibilità di aprire i files .RAR su Ubuntu procedere cosi:
sudo apt-get update
sudo apt-get install unrar
dopo di che cliccando su un file .RAR sarete in grado di aprirlo
ciao
per integrare la possibilità di aprire i files .RAR su Ubuntu procedere cosi:
sudo apt-get update
sudo apt-get install unrar
dopo di che cliccando su un file .RAR sarete in grado di aprirlo
ciao
venerdì 18 febbraio 2011
Ubuntu 10.10 Grub2 menu howto Show / Hide
Here some instructions on how to show or display the grub2 menu during the Ubuntu startup.
from the menu select Applications - Accessories - Terminal and write the command:
sudo gedit /etc/default/grub
search for this line:
GRUB_HIDDEN_TIMEOUT=0
well, this way the menu is HIDDEN
if we want to SHOW it at every startup, we need to comment out that line using # ,like this :
# GRUB_HIDDEN_TIMEOUT=0
save the opened file after the change
then write this command:
sudo update-grub
as soon as it finish to update everything, we can reboot the system and see the new menu behaviour.
To HIDE it again simply do the same, remove the # symbol, save, run update-grub and it's done
martedì 1 febbraio 2011
Ubuntu : installazione da usb key
Ciao
per installare Ubuntu (testato con versione 10.04 e 10.10) da chiavetta usb procedere cosi:
da terminale lanciare
usb-creator-gtk
nel caso non fosse installato procedere al solito
sudo apt-get install usb-creator-gtk
Una volta eseguito il programma presenta questa finestra:

in alto selezioneremo il lettore cd/dvd oppure il file .iso del disco di Ubuntu da passare sulla chiavetta usb.
In basso selezioniamo la chiavetta USB (qui /dev/sdb1)
Quindi premiamo il pulsante Make Startup Disk e in poco tempo ci ritroveremo la chiavetta usb bootabile da cui installare ubuntu :)
venerdì 28 gennaio 2011
Ubuntu 10.04.1 cambio lingua italiana offline senza connessione internet
Ciao!
se vi è capitato di installare Ubuntu in inglese e poi passarlo in italiano vi sarete accorti che la cosa è abbastanza semplice utilizzando internet.
Ma se per qualche motivo sul pc incriminato non avete la connessione internet?
Ecco la soluzione, da un pc con la possibilità di andare in internet andate su questo sito (attenzione, io sto usando la 10.04.1 quindi "lucid", ovviamente cambia il link se avete un'altra versione) :
http://packages.ubuntu.com/lucid/allpackages
e scaricate questi pacchetti:
per cambiare la lingua di Ubuntu
witalian_1.7.3-0.1_all.deb
myspell-it_3.2.0-3ubuntu3_all.deb
language-support-writing-it_10.04+20100311_all.deb
language-support-it_9.10+20090909_all.deb
language-pack-it_10.04+20100421_all.deb
language-pack-it-base_10.04+20100421_all.deb
language-pack-gnome-it_10.04+20100421_all.deb
language-pack-gnome-it-base_10.04+20100421_all.deb
per cambiare la lingua di OpenOffice
openoffice.org-l10n-common_3.2.0-7ubuntu1_all.deb
openoffice.org-l10n-it_3.2.0-7ubuntu1_all.deb
openoffice.org-help-it_3.2.0-7ubuntu1_all.deb
openoffice.org-hyphenation-it_3.2.0-3ubuntu3_all.deb
openoffice.org-thesaurus-it_2.0.7.gh.deb1-1.1ubuntu1_all.deb
la maggior parte di questi possono essere doppio-cliccati per essere installati, sfortunatamente alcuni dipendono ricorsivamente uno dall'altro quindi non si riesce ad installarli se non usando il comando dpkg, passandogli i 2 package che dipendono uno dall'altro:
sudo dpkg --install language-pack-gnome-it_10.04+20100421_all.deb language-pack-gnome-it-base_10.04+20100421_all.deb
a sto punto visto che dobbiamo usare dpkg per installare questi 4 packages tanto vale scrivere un paio di scripts per installarli tutti allo stesso modo:
file "set-italiano-ubuntu"
#!/bin/sh
sudo dpkg --install witalian_1.7.3-0.1_all.deb
sudo dpkg --install myspell-it_3.2.0-3ubuntu3_all.deb
sudo dpkg --install language-support-writing-it_10.04+20100311_all.deb
sudo dpkg --install language-support-it_9.10+20090909_all.deb
sudo dpkg --install dpkg_language-pack-it_10.04+20100421_all.deb language-pack-it-base_10.04+20100421_all.deb
sudo dpkg --install language-pack-gnome-it_10.04+20100421_all.deb language-pack-gnome-it-base_10.04+20100421_all.deb
file "set-italiano-openoffice"
#!/bin/sh
sudo dpkg --install openoffice.org-l10n-common_3.2.0-7ubuntu1_all.deb
sudo dpkg --install openoffice.org-l10n-it_3.2.0-7ubuntu1_all.deb
sudo dpkg --install openoffice.org-help-it_3.2.0-7ubuntu1_all.deb
sudo dpkg --install openoffice.org-hyphenation-it_3.2.0-3ubuntu3_all.deb
sudo dpkg --install openoffice.org-thesaurus-it_2.0.7.gh.deb1-1.1ubuntu1_all.deb
una volta creati ci assicuriamo nelle proprietà che abbiano il permesso "execute" e quindi con un doppio click li eseguiamo, diamo la password e aspettiamo che finiscano il lavoro.
A quel punto la lingua italiana è installata non ci resta che dire a ubuntu che la vogliamo usare quindi andiamo in
System -> Administration -> Language Support
se dà un messaggio di richiesta di Update, cliccate pure su Cancel visto che non abbiamo internet non vogliamo nemmeno provarci (darebbe comunque errore).
In "Language or menus and windows " scorriamo fino in fondo dove troveremo "italiano" fra le lingue selezionabili, la trasciniamo verso l'alto in modo che sia la prima voce.
Adesso clicchiamo su "Apply System-Wide"
Andiamo nella tab "Text" dal menu a discesa selezioniamo "italiano" e clicchiamo anche qui su "Apply System-Wide"
Possiamo riavviare il pc (o rifare la login).
Rientrando sarà tutto in italiano.
Ci comparirà una finestra che ci chiede se vogliamo rinominare le cartelle in italiano, confermiamo e abbiamo finito.
se vi è capitato di installare Ubuntu in inglese e poi passarlo in italiano vi sarete accorti che la cosa è abbastanza semplice utilizzando internet.
Ma se per qualche motivo sul pc incriminato non avete la connessione internet?
Ecco la soluzione, da un pc con la possibilità di andare in internet andate su questo sito (attenzione, io sto usando la 10.04.1 quindi "lucid", ovviamente cambia il link se avete un'altra versione) :
http://packages.ubuntu.com/lucid/allpackages
e scaricate questi pacchetti:
per cambiare la lingua di Ubuntu
witalian_1.7.3-0.1_all.deb
myspell-it_3.2.0-3ubuntu3_all.deb
language-support-writing-it_10.04+20100311_all.deb
language-support-it_9.10+20090909_all.deb
language-pack-it_10.04+20100421_all.deb
language-pack-it-base_10.04+20100421_all.deb
language-pack-gnome-it_10.04+20100421_all.deb
language-pack-gnome-it-base_10.04+20100421_all.deb
per cambiare la lingua di OpenOffice
openoffice.org-l10n-common_3.2.0-7ubuntu1_all.deb
openoffice.org-l10n-it_3.2.0-7ubuntu1_all.deb
openoffice.org-help-it_3.2.0-7ubuntu1_all.deb
openoffice.org-hyphenation-it_3.2.0-3ubuntu3_all.deb
openoffice.org-thesaurus-it_2.0.7.gh.deb1-1.1ubuntu1_all.deb
la maggior parte di questi possono essere doppio-cliccati per essere installati, sfortunatamente alcuni dipendono ricorsivamente uno dall'altro quindi non si riesce ad installarli se non usando il comando dpkg, passandogli i 2 package che dipendono uno dall'altro:
sudo dpkg --install language-pack-it_10.04+20100421_all.deb language-pack-it-base_10.04+20100421_all.deb
sudo dpkg --install language-pack-gnome-it_10.04+20100421_all.deb language-pack-gnome-it-base_10.04+20100421_all.deb
a sto punto visto che dobbiamo usare dpkg per installare questi 4 packages tanto vale scrivere un paio di scripts per installarli tutti allo stesso modo:
file "set-italiano-ubuntu"
#!/bin/sh
sudo dpkg --install witalian_1.7.3-0.1_all.deb
sudo dpkg --install myspell-it_3.2.0-3ubuntu3_all.deb
sudo dpkg --install language-support-writing-it_10.04+20100311_all.deb
sudo dpkg --install language-support-it_9.10+20090909_all.deb
sudo dpkg --install dpkg_language-pack-it_10.04+20100421_all.deb language-pack-it-base_10.04+20100421_all.deb
sudo dpkg --install language-pack-gnome-it_10.04+20100421_all.deb language-pack-gnome-it-base_10.04+20100421_all.deb
file "set-italiano-openoffice"
#!/bin/sh
sudo dpkg --install openoffice.org-l10n-common_3.2.0-7ubuntu1_all.deb
sudo dpkg --install openoffice.org-l10n-it_3.2.0-7ubuntu1_all.deb
sudo dpkg --install openoffice.org-help-it_3.2.0-7ubuntu1_all.deb
sudo dpkg --install openoffice.org-hyphenation-it_3.2.0-3ubuntu3_all.deb
sudo dpkg --install openoffice.org-thesaurus-it_2.0.7.gh.deb1-1.1ubuntu1_all.deb
una volta creati ci assicuriamo nelle proprietà che abbiano il permesso "execute" e quindi con un doppio click li eseguiamo, diamo la password e aspettiamo che finiscano il lavoro.
A quel punto la lingua italiana è installata non ci resta che dire a ubuntu che la vogliamo usare quindi andiamo in
System -> Administration -> Language Support
se dà un messaggio di richiesta di Update, cliccate pure su Cancel visto che non abbiamo internet non vogliamo nemmeno provarci (darebbe comunque errore).
In "Language or menus and windows " scorriamo fino in fondo dove troveremo "italiano" fra le lingue selezionabili, la trasciniamo verso l'alto in modo che sia la prima voce.
Adesso clicchiamo su "Apply System-Wide"
Andiamo nella tab "Text" dal menu a discesa selezioniamo "italiano" e clicchiamo anche qui su "Apply System-Wide"
Possiamo riavviare il pc (o rifare la login).
Rientrando sarà tutto in italiano.
Ci comparirà una finestra che ci chiede se vogliamo rinominare le cartelle in italiano, confermiamo e abbiamo finito.
martedì 25 gennaio 2011
Ubuntu, compilazione SDL + OpenGL ( GCC )
Mi è capitato di compilare degli esempi di utilizzo della libreria SDL, per questi non ci sono grandi problemi, basta la classica sintassi:
gcc nomefile.c `sdl-config --cflags --libs` -o nomefile
quando però sono arrivato agli esempi che utilizzano OpenGl ho notato che gli errori circa riferimenti mancanti alle varie funzioni di OpenGL, ad esempio:
...
testgl.c:(.text+0x25e): undefined reference to `glPushAttrib'
testgl.c:(.text+0x26a): undefined reference to `glDisable'
testgl.c:(.text+0x276): undefined reference to `glDisable'
testgl.c:(.text+0x282): undefined reference to `glEnable'
testgl.c:(.text+0x28e): undefined reference to `glEnable'
testgl.c:(.text+0x2a2): undefined reference to `glBlendFunc'
...
la soluzione è abbastanza semplice, aggiungiamo -lGL per dire che vogliamo linkare la libreria di OpenGl:
gcc nomefile.c -lGL `sdl-config --cflags --libs` -o nomfile
notare che lo stesso vale nel caso facessimo uso anche di altre librerie, ad esempio "glut" :
gcc nomefile.c -lGL -lglut `sdl-config --cflags --libs` -o nomfile
se poi il nostro sorgente controlla che ci sia un define come ad esempio "HAVE_OPENGL" allora possiamo compilare cosi:
gcc nomefile.c -lGL -lglut `sdl-config --cflags --libs` -o nomfile -DHAVE_OPENGL
sabato 22 gennaio 2011
Anjuta compile error You must have `glib' installed
Hi all
today I tried Anjuta IDE, very nice enviroment,
unfortunately when I tried to compile a simple hello world source file I got this error:
**Error**: You must have `glib' installed.
but fortunately after some googoling I found the solution, and it's quite simple to do, just this:
after that I compiled the source without issue :)
if you then are working with SDL libraries and want to compile try this:
to use SDL libraries for sound install this:
a sound alternative could be OpenAL ( http://connect.creativelabs.com/openal/default.aspx )
bye
today I tried Anjuta IDE, very nice enviroment,
unfortunately when I tried to compile a simple hello world source file I got this error:
**Error**: You must have `glib' installed.
but fortunately after some googoling I found the solution, and it's quite simple to do, just this:
sudo aptitude install libglib2.0-dev libgtk2.0-dev
after that I compiled the source without issue :)
if you then are working with SDL libraries and want to compile try this:
sudo apt-get install libsdl1.2-dev libsdl-gfx1.2-dev libsdl-image1.2-dev libsdl-net1.2-dev libsdl-ttf2.0-devto use SDL libraries for sound install this:
sudo apt-get install libsdl-mixer1.2-dev libsdl-sound1.2-dev
a sound alternative could be OpenAL ( http://connect.creativelabs.com/openal/default.aspx )
sudo apt-get install libopenal-dev
bye
venerdì 21 gennaio 2011
Personalizzare Ubuntu con UbuntuTweak
Ciao,
oggi ho trovato questo programmino interessante per personalizzare ubuntu sotto vari aspetti
Provato su Ubuntu 10.10 e funziona davvero bene e presenta interessanti caratteristiche di personalizzazione tra cui lapossibilità di aggiungere a nautilus la funzione "apri terminale qui " (anche con diritti amministrativi) cliccando col tasto destro su una cartella:
Andate sul sito: http://ubuntu-tweak.com/
nella prima pagina cliccare sul pulsante "Dowload Now", salvate il pacchetto .deb e quindi installatelo come al solito cliccando sul pulsante "installa"
Poi dal menu delle applicazioni andate a lanciare Ubuntu Tweak
cercate questa icona in basso a sinistra:

e nelle opzioni a destra in basso selezionate queste 2:

ora quando da nautilus cliccherete col tasto destro del mouse su una cartella avrete a disposizione queste opzioni:

oggi ho trovato questo programmino interessante per personalizzare ubuntu sotto vari aspetti
Provato su Ubuntu 10.10 e funziona davvero bene e presenta interessanti caratteristiche di personalizzazione tra cui lapossibilità di aggiungere a nautilus la funzione "apri terminale qui " (anche con diritti amministrativi) cliccando col tasto destro su una cartella:
Andate sul sito: http://ubuntu-tweak.com/
nella prima pagina cliccare sul pulsante "Dowload Now", salvate il pacchetto .deb e quindi installatelo come al solito cliccando sul pulsante "installa"
Poi dal menu delle applicazioni andate a lanciare Ubuntu Tweak
cercate questa icona in basso a sinistra:
e nelle opzioni a destra in basso selezionate queste 2:
ora quando da nautilus cliccherete col tasto destro del mouse su una cartella avrete a disposizione queste opzioni:
Caloli statistici con R su Ubuntu 10.10
Ciao,
oggi ho provato ad installare (con successo) l'ambiente di calcolo statistico " R "
dopo di che, visto che lavorare da linea di comando non è il massimo mi sono dedicato all'installazione di una GUI (interfaccia grafica) che mi semplificasse il lavoro.
Sotto Ubuntu 10.10 la cosa è molto semplice e si limita a questi 2 step:
sudo apt-get install r-base
sudo apt-get install rkward
il primo comando installa l'ambiente R vero e proprio
il secondo comando installa la GUI che si interfaccia ad R
Qualche link utile:
La homepage del progetto: http://www.r-project.org/
Un sito di esempi per partire: http://www.mayin.org/ajayshah/KB/R/index.html
giovedì 13 gennaio 2011
Installa e configura SUN Java JRE 6 su Ubuntu
Oggi mi è capitato di dover far girare un programma java su Ubuntu, mi dava strani errori che di cui non capivo la natura, poi ho capito che dipendevano dal Java in uso dalla mia installazione Ubuntu. Installando la versione Java JRE 6 di Sun il problema si è risolto.
Per installare Sun Java JRE 6 procedere cosi:
1. controlliamo la versione di Java in uso
java -version
java version "1.5.0"
gij (GNU libgcj) version 4.4.5
ok, non è la jre 6 di sun... proseguiamo
sudo apt-get install sun-java6-jre sun-java6-plugin sun-java6-fonts
a questo punto andiamo a modificare il java da utilizzare:
update-alternatives --config java
Selection Path Priority Status
------------------------------------------------------------
* 0 /usr/bin/gij-4.4 1044 auto mode
1 /usr/bin/gij-4.4 1044 manual mode
2 /usr/lib/jvm/java-6-sun/jre/bin/java 63 manual mode
a questo punto selezioniamo l'opzione 2 e siamo a posto
iPOD su Ubuntu con Banshee
Ciao
questo sarà il post piu breve della storia...
se dovete far funzionare il vostro iPod con Ubuntu... vi consiglio BANSHEE
dopo aver provato vari programmi e aver avuto ogni tipo di problema, ho trovato che questo funziona molto bene, senza problemi e assomiglia molto ad iTunes
http://banshee.fm/
questo sarà il post piu breve della storia...
se dovete far funzionare il vostro iPod con Ubuntu... vi consiglio BANSHEE
dopo aver provato vari programmi e aver avuto ogni tipo di problema, ho trovato che questo funziona molto bene, senza problemi e assomiglia molto ad iTunes
http://banshee.fm/
venerdì 7 gennaio 2011
Configurare Evolution per Hotmail
Ciao,
oggi qualche nota per far funzionare il client di posta Evolution con Hotmail.
Schermate prese da Evolution sotto Ubuntu 10.10


cosi mi ha funzionato senza problemi.
Da notare che ho provato gli stessi settaggi da una adsl tele2=teletu=vodafone e non ne voleva sapere di funzionare linvio (smtp)... provando anche usando la porta 587 al posto della classica 25, quindi il sospetto è che i signori della tele2=teletu=vodafone hanno messo qualche filtro che impedisce questo tipo di comunicazioni ...
Iscriviti a:
Post (Atom)